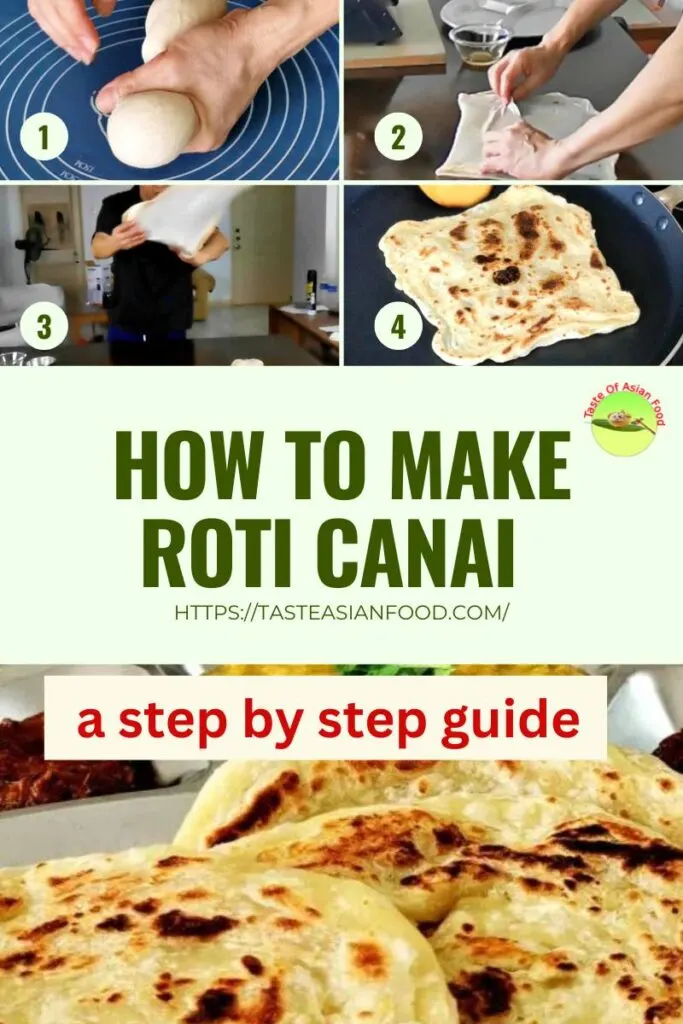
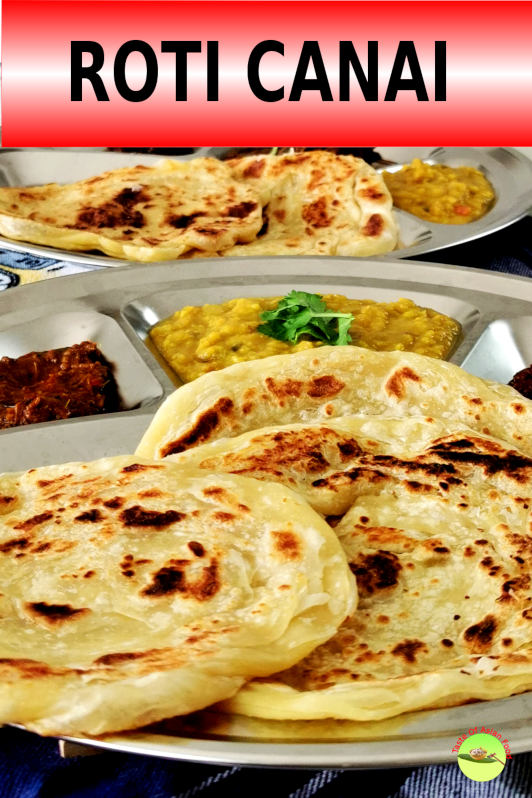
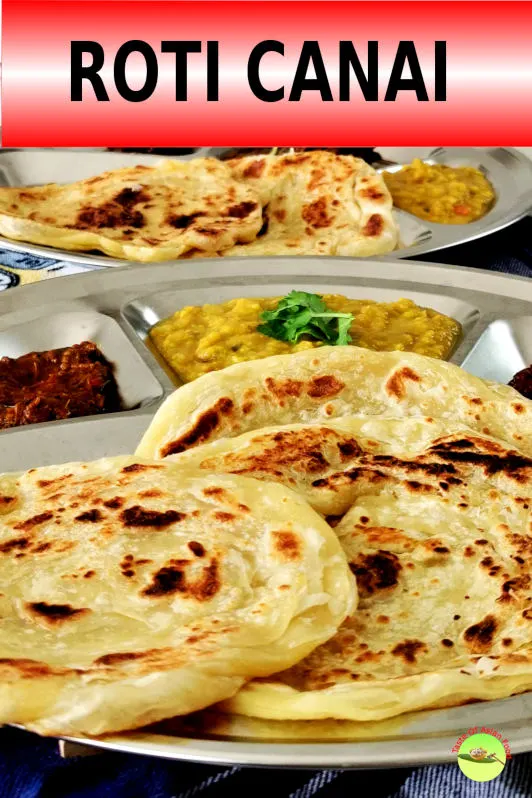
Roti canai is an Indian-influenced flatbread that has become Malaysia’s national bread. I will explain how to make roti canai in detail in this article. Following this recipe will make roti canai taste precisely what you can get from the Mamak restaurants with a fluffy texture.
One of the integral parts of this article is the embedded video because the best way to explain how to flip the roti canai is by showing it visually. I also shot the flipping action in slow motion with my voice-over explanation.
❓Why do I write this article?
Although excellent recipes (and videos) show precisely how to make roti, unfortunately, they are mostly written in Malay. It is also hard to find any video showing how to flip (‘tebar’ in Malay) the roti canai in slow motion. Therefore, I want to explain it in English so that everyone who does not understand the Malay language (our national language) can learn how to make it precisely.
Although we can get a roti canai at every nook and corner in Malaysia for only RM2 (USD0.50), it can be as pricey as USD5.00 in other parts of the world. I think it’s worth it to make it yourself if you are staying abroad; it is a straightforward process once you master it.

Note: This post may contain affiliate links. Please read my privacy policy for more info. I may receive commissions for purchases made through links in this post. As an Amazon Associate, I earn from qualifying purchases.
The arrangement of this article
Since this is a long article, I have divided it into five sections. You can click the link below, bringing you to the respective section.
- What is roti canai?
- Kneading the dough
- Shaping the dough
- Cook the roti canai
- Common questions about making roti canai
1. What is roti canai?
Roti canai is a flatbread usually served with dhal or other types of curry. I remember many years ago. I used to have this flatbread daily as a houseman pharmacist in a hospital in Teluk Intan. The roti canai was made on the spot upon order. It is crispy on the outside with clearly separated layers inside. I used to have it with some dhal and a cup of teh tarik. It only cost me less than one ringgit during that era. ( that was way back in the 70s).
a. The origin of roti canai
There are different theories about the origin of roti canai. Since it is an Indian influence flatbread, it has been claimed that it is referred to Chennai, an Indian city on the east coast, formerly known as Madras, since most Malaysian Indians are from the Southern State of Tamil Nadu, where Chennai is the capital.
Another saying mentioned that canai is derived from chana, a Northern Indian dish mixed with chickpeas in spicy gravy. Roti canai does not have a strong relationship with Northern India either because roti canai is more similar to the parotta, another type of flatbread from Southern India. It is also generally served with dal instead of chickpeas.
However, it is also likely derived from the Malay word canai, which means to roll and flatten the dough thinly. I think this is the most plausible explanation. In addition, it describes the action of making roti canai quite well.
b. Roti prata
Despite the contradictory theories, Indians arrived in Malaysia in large numbers by the last century’s turn, mostly working in the rubber estates and later in the oil palm plantations, making the paratha style flatbread. It is evident that this claim is called roti paratha in Singapore. Nowadays, roti canai is served in all Indian Muslim restaurants and stores and is usually referred to as the round-shaped roti canai.
2. Kneading the dough
How to make roti canai? Here is the step-by-step instructions on how to make roti canai. The preparation involves three primary steps- kneading the dough, shaping the dough, and cooking on the griddle, flat pan, or Tawa.
The method of kneading the dough is quite similar to other flatbreads. It is nearly identical to making chapati in another article I have just published. The only difference is the list of ingredients used.
Chapati is made with flour and water and occasionally added with salt and oil. For roti canai, salt and oil are the basic ingredients that cannot be omitted. Unlike chapati, roti canai can be eaten without any gravy or accompaniment. The egg is another common ingredient in the list to enhance the flavor. Some recipes also include condensed milk, while others use sugar to sweeten it.
a. Here are the steps to knead the dough:
- Mix the flour, water, egg, sugar, and salt in a large bowl. You can either make it manually or with an electric mixer. I prefer to mix it by hand if the quantity is small. (Please refer to the note section of the recipe for a recipe with condensed milk.)
- The dough is very sticky at the beginning. The water will be incorporated into the flour as time passes, making it less sticky.
- Add a small amount of oil or ghee after one or two minutes of kneading. Incorporate the oil with the dough until it clumps together and pick up all four in the mixing bowl.
- You can continue kneading the dough in the bowl or transfer it to a work surface. I prefer to continue kneading on a pastry mat because it is less sticky.
- Continue kneading the dough for another five minutes until the gluten fully develops. When this happens, the dough will become elastic, stretchable, non-sticky, and smooth on the surface. This process should be quite familiar to anyone who has made bread before.
b. Rest the dough
- Let the dough rest for five minutes, then shape it into a cylinder.
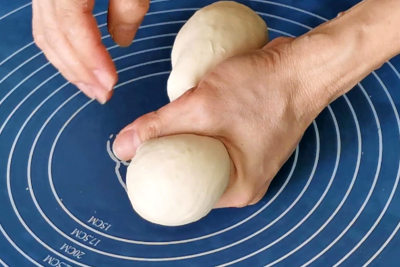
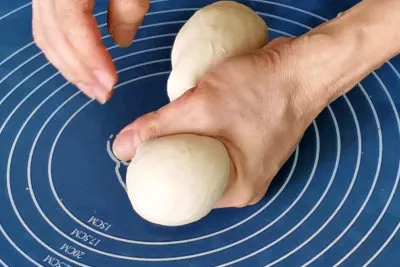
- Divide the dough into equal portions. You can use a dough cutter to divide it, push part of the dough through the gap between your thumb and index finger, then pinch to detach it. The experienced roti canai vendor can portion the dough quickly and accurately. The dough for each roti canai is typically about 80g each.
- Roll each dough portion with your palm to form smooth balls.
- Apply some softened butter or melted ghee on your palm. Pick up each soft dough ball and rub the butter liberally on the surface of the dough. This step will add the flavor of roti canai and prevent the dough’s surface from drying.
- Arrange the dough balls in a container. Cover with a damp cloth, cling wrap, or plastic wrap. Let the raw dough relax for at least three hours or overnight before shaping.
3. Shaping the dough
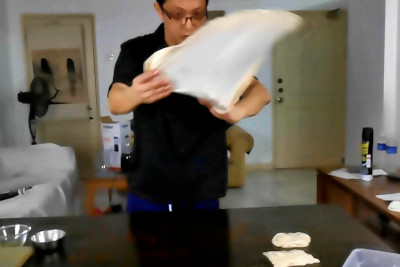
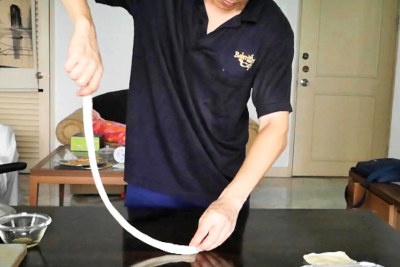
The unique part of making roti canai is spreading out the dough to paper-thin. You can either do it by stretching the dough with your hand or by flipping it.
Most of the roti canai vendors use a stainless steel work surface. You can use any smooth surface, like your kitchen tabletop or the dining table.
Here are the detailed steps:
a) Spread out the roti canai dough
- Let the dough relax overnight or at least 3 hours before working on the dough. The dough will bounce back, be tough to stretch to paper-thin, and potentially easy to break if it is not adequately rested.
- Apply some oil liberally on the work surface.
- Place a piece of the dough on the oiled surface and drizzle a few drops of ghee.
- Since the dough and the table are covered with oil, spreading the dough with your hand is easy. Press and stretch the dough with your palm to form a 6-inch disc. Using a rolling pin is not necessary because stretching with your hand is more efficient.
- Make sure the edge of the disc is paper-thin and translucent and the center is thicker. The force generated during flipping will stretch the center part more than the perimeter. The dough will tear during flipping if the center is too thin.
From here, you can either use the flipping or stretching method as below.
b1) The flipping method:
This section is perhaps the most challenging part of making roti canai. Is flipping roti canai a critical technique or just for showmanship?
Roti canai sellers are not only showcasing their flipping skills to attract customers. It is an important skill to make the dough paper-thin.
I try to write down the details of how to flip the dough, but it is more useful if explained with a slow-motion video clip, which is far more effective than a comprehensive hand-written guide. You can view the flipping action in the video in this article.
However, there are a few essential points that I can summarize below:
(Note: the following description is for the right-hander. You must reverse all the s of ‘left’ steps and ‘right’ if you are left-handed.)
Here are the step-by-step instructions:
- Grab the dough with the left hand on the right side near you, with your hand facing down. (Thumb below the dough, with the rest of the fingers on top)
- Grab the dough with the right hand on the right side further from you, with your hand facing up. (Thumb on top, with the rest of the fingers supporting the dough at the bottom.)
- Stretch the dough by pulling it towards you with your left hand to create tension before starting the flipping motion. Both hands must maintain a slight tension to continuously stretch the dough throughout the action.
The flipping action
- Flip to the left: Right hand: Start by flipping the dough with your right hand to the left, move in a near-vertical circular motion, to the left and across slightly over the left hand. (Please revert the direction if you are left-handed.) Most of the flipping is done by the right hand during this part.
- Left hand: Hold the dough lightly while the right hand travels over the left hand. The action is mostly done by the right hand.
- Flip to the right: (The return path)
- Right hand: Continue the flipping motion by reversing the direction to the right by following an upward, circular, and throwing motion.
- Left hand: Start throwing with the hand facing right while the dough travels back to the right. It is finished with a slamming motion to land the dough on the work surface.
- Please note that the left hand is nearer to you than the right at the beginning of the flipping motion, roughly perpendicular to you. After finishing the flip, both hands landed parallel to you. The 90° turn creates a swinging motion to expand the size of the dough.
- After finishing the first flip, use the left hand to grab the dough’s perimeter at the next position. Ideally, the position should be where the right hand held the dough during the first flip. As for the right hand, grab another part of the dough’s perimeter slightly away from your left hand.
- Repeat the flipping action until the dough becomes paper-thin and translucent.

b2) The stretching method
This method is much easier to master than the flipping method. The final texture and flavor are identical to the flipping method. The disadvantage is it is much slower, and the thickness is not even.
- Grab the dough’s corners with your hand, lift it, and stretch it as far as possible without breaking it.
- Put it back on the table and gently press it against the table to adhere. Then, pick up the other two corners and stretch them out as far as possible while the other two corners still stick on the table.
- Place the second set of stretched corners on the table. Now, the roti canai has stretched out to a large square.
- Lift the dough’s sides, pull, and stretch outwards as much as possible without breaking it.
- Make sure the dough is paper-thin by stretching it around the dough perimeter with your finger.
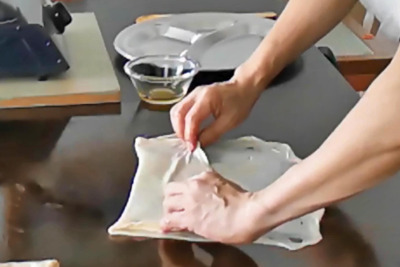
c) To finish the folding:
- Sprinkle a few drops of ghee on the surface. Spread out the oil so that it covers the entire dough. The ghee (you can use any oil) will separate the thin layers of dough. These thin layers of dough will become flaky layers after cooking. This laminating technique is also used in making puff pastry and croissants.
- Fold the two corners away from you with two hands in the middle. Try to capture as much air as possible between the layers.
- To make a square-shaped roti canai, imagine the dough is made of three rectangles. Fold the rectangles furthest from you onto the middle. After that, fold the rectangle nearest to you onto the middle rectangle. Next, fold the left and right to the center to form a square.
- To make a round roti canai, ignore the left and right folding and make more front and back folds, forming a thin wrinkle log. Hold up one end of the log, coil it into a spiral shape like a snail, and tuck the other end neatly beneath the dough.
- Set aside to let it relax for thirty before cooking. You can leave it for longer so that the dough rests at room temperature further. It isn’t easy to flatten the dough thinly if it is not fully rested.


4. Cook the roti canai
- Flatten the dough gently with your fingertips on an oiled surface.
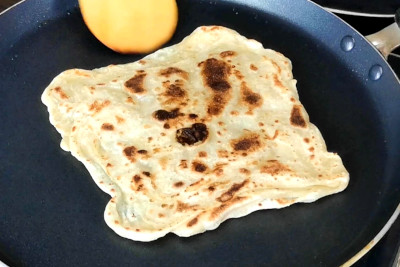
- Lightly grease a griddle and place the roti canai over medium heat. Let it cook for half a minute until the bottom has firmed up and with some brown spots. You will notice some air bubbles expand in between the layers.
- Flip over to cook the other side. When both sides have become slightly brown, turn it over until crispy and golden brown.
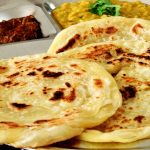
- Stack up the roti canais while they are still hot, and give them a little fluff by squeezing them with the palm of your hand to separate the fluffy layers.
- Serve it up with your favorite fish curry and dhal.

5. Common questions about making roti canai
1. What type of flour is best for making roti canai?
Maida flour is a flour from India widely used to make flatbread. It had a relatively high gluten content, but the heat generated during production denatures the protein, causing it to make leavened bread unsuitable.[
Due to maida flour being unavailable, I have tried a few types of flour, and the best result is from flour, with between 11% and 12% protein. An easy way to get flour with this percentage of protein is to mix one part of all-purpose flour (9% protein) with three parts of bread flour (13%)
Flour with less than this amount of protein tends to develop less gluten. The dough is less elastic and, therefore, can break easily during flipping. You can also use bread flour solely, which works well based on my test result.
2. Is flipping a critical technique to make a perfect roti canai?
Flipping is not a must when making roti canai. However, it is much faster to spread the dough to paper-thin. It also results in a more uniform thickness than stretching the dough with your hands on the working surface.
3. Can I reduce the amount of oil in the recipe?
The amount of oil in the recipe is relatively small. You must apply enough oil on the work surface to prevent the dough from sticking. To create a crispy surface, you need oil in the griddle (even if it is non-stick).
Do not limit the amount of oil used to laminate the dough because it will cause the roti canai to become less fluffy. (please refer to point 6).
4. Is it advisable to add milk to enhance the flavor of roti canai?
You can substitute part of the water with milk in the recipe. The locals like to add some condensed milk. Since condensed milk is already sweetened, you must omit the sugar in the formula. (Please refer to the notes section of the recipe for the recipe with condensed milk)
5. What are the common variants apart from making the basic roti canai?
The most common variant is the roti telur, which means roti canai with egg. After flipping the dough, beat an egg and drizzle on the dough’s surface before folding it to form a square. Other favorite ingredients are onion and sardine. Murtabak is another variant that wraps meat inside the roti.
6. Why is my roti canai not as fluffy and crispy as those sold at the restaurant?
One possible reason is insufficient oil sprinkled onto the surface before folding up the roti canai. The fluffy layer is created by laminating the dough. The technique is similar to making puff pastry or croissant, in which a layer of oil on the dough creates multiple thin layers by separating them during folding.
Sufficient amounts of oil are also required to crisp up the surface. Therefore, you still need to add some oil to the griddle, even though you use a non-stick pan to create a crispy surface.
7. How to prevent my dough from tearing during flipping?
It is entirely acceptable if there is only a small tear, as it will not affect the layer of the roti canai. However, large tears will reduce the layers and make it unsuitable for roti telur (egg roti canai) as the egg will leak out.
Besides flipping it carefully, using the right type of flour is essential. Whole wheat flour and low protein flour (cake flour) are not ideal because they will form less gluten during kneading and tend to be less stretchable. Please refer to point (1) in this section for the correct choice of flour.
8. There is too much oil in the roti canai
Plenty of oil is required to make roti canai, but the amount is still less than croissants and brioche. The best oil is ghee, but you can substitute it with olive oil or other vegetable oil.
You can make chapati, another type of flatbread, without using oil as a healthier option.
9. How to store roti canai?
Roti canai can be kept for 1-2 days in an airtight container or up to a week if refrigerated.
If you intend to keep it longer, cook the roti canai just until slightly crisp. Keep it in an airtight container or ziplock bag in the freezer for up to three months.
Reheat it on the griddle before serving.

Roti Canai – How to make it at home
Roti canai is an Indian-influenced flatbread that has become the national bread of Malaysia. I will explain how to make roti canai in detail in this article. You will make roti canai taste precisely what you can get from the Mamak restaurant with a fluffy texture by following this recipe.
Ingredients
- 50g (0.55 cup) flour all-purpose flour
- 150g (1.66 cup) bread flour
- 1/3 beaten egg (about 16g)
- 115ml (0.48 cup) water
- 2g (1/2 tsp) salt
- 6g (1 tsp) sugar
- 1 tsp ghee
Instructions
(Note: This is the abbreviation version of the instruction. Please refer to the text of this article and the video for the details.)
Knead the dough
- Mix the flour, water, condensed milk, egg, and salt in a mixing bowl. Add the ghee after one or two minutes of kneading.
- Continue kneading the dough for another five minutes until it becomes elastic, stretchable, non-sticky, and smooth on the surface.
- Let the dough rest for five minutes, then shape it into a cylinder.
- Divide the dough into individual portions, about 80g each. Cover and let it relax overnight.
Flip the dough
- Press and stretch the dough with your palm to form a 6-in disc on an oiled surface.
- Flip the dough with both hands by throwing it up in a circular motion. (Please watch the video for the demo.)
- Repeat the flipping action a few times until the dough becomes paper-thin and translucent.
- Spread out the dough by stretching out the edges.
Shape the roti canai
- Rub some ghee on the surface.
- To make square roti canai: Fold the 1/3 furthest from you onto the middle row. After that, fold 1/3 nearest to you onto the middle rectangle. Next, fold the left and right to the center to form a square.
- To make a round roti canai: Ignore the left and right folding, and make more front and back fold, forming a thin wrinkle log. Hold up one end of the log, coil it into a spiral shape of a snail, then tuck the other end beneath the dough neatly.
- Set aside to let it relax for thirty before cooking.
Cook the roti canai
- Flatten the dough gently.
- Cook the roti canai on a heated griddle for half a minute until the bottom has firmed up and developed some brown spots.
- Flip over to cook the other side until both sides are crispy and golden brown.
- Stack up the roti canais while they are still hot and give them a little fluff by squeezing between your palms to create the fluffy texture.
- Serve it up with your favorite curry.
Notes
This roti canai recipe is with condensed milk, which is used by many local cooks. However, I find that there is no noticeable difference compared to the recipe with the condensed milk.
Ingredients:
50g flour all-purpose flour
150g bread flour
1/3 beaten egg (about 16g)
90ml water
25ml condensed milk
2g salt
1 tsp ghee
Recommended Products
As an Amazon Associate and member of other affiliate programs, I earn from qualifying purchases.
-
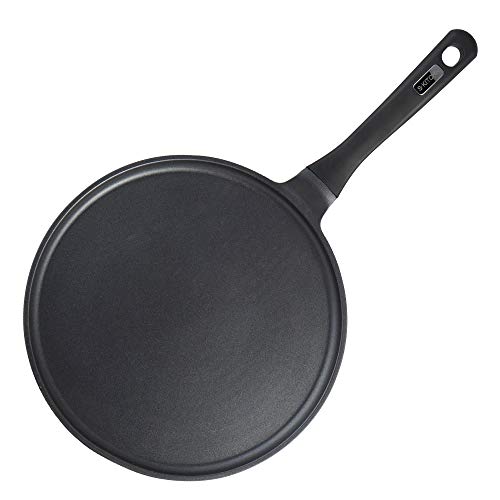 S·KITCHN Crepe Pan Nonstick Die-cast Aluminum Non-stick Induction Compatible Flat Tawa Griddle - 11Inches
 -
 Original Grass-Fed Ghee by 4th & Heart, 16 Ounce, Keto, Pasture Raised, Non-GMO, Lactose Free, Certified Paleo
 -
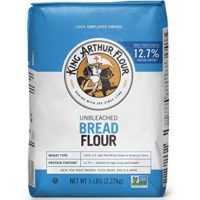
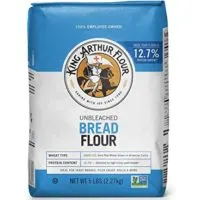 King Arthur Flour Unbleached Bread Flour, 5 Pound (Packaging May Vary)
 -
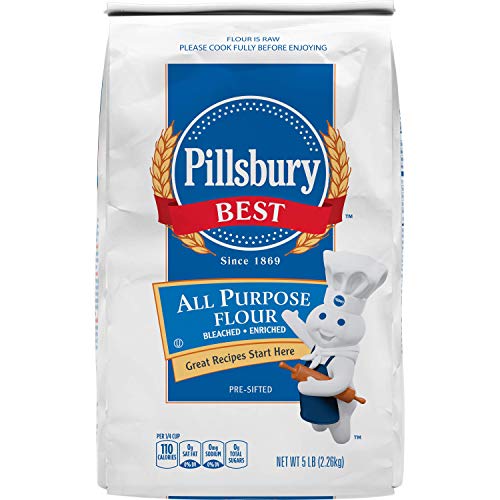 Pillsbury Best All Purpose Flour, 5 Pound
Nutrition Information:
Yield: 8 Serving Size: 1Amount Per Serving: Calories: 157Total Fat: 1gSaturated Fat: 0gTrans Fat: 0gUnsaturated Fat: 1gCholesterol: 7mgSodium: 101mgCarbohydrates: 31gFiber: 1gSugar: 1gProtein: 5g
This data was provided and calculated by Nutritionix on 11/2/2020
Haylee
Sunday 18th of August 2024
Hi KP,
Thanks so much for this recipe!
I'm really keen to make this but I'm so confused by your notes and the method.
In the notes you mention after the dough is cut into 80g portions, to rub butter over this before wrapping in glad wrap and resting over night, yet the method in your recipe doesn't mention this step at all. Can you please answer if this step is needed or not, I wish I had put butter on my dough for the flavors but it didn't say to do that in your method, only your notes.
I also used flours with the protein that you mentioned and yet after kneading the dough for 5 minutes it was still very sticky and not smooth, I rested overnight and it was still very very sticky, why would this be if I used flours with the same protein content do you think?
The last thing I'm confused about is you use oil or ghee when folding and stretching the dough, but you don't mention the quantity of oil or ghee to use yet you cover questions around too much oil or not enough. There's nothing in the ingredients list either. I'm stumped how to proceed when I don't know the quantities needed when folding? I don't want to over do it or under do it, how much ghee or oil is required when folding and stretching?
Hope this makes sense and thanks for your help, much appreciated!
KP Kwan
Wednesday 21st of August 2024
Hi Haylee,
Applying melted butter to each individual 80g of dough adds flavor to the roti and prevents the surface from drying out. It is not mandatory, but it is good to do to prevent the surface from drying out.
The type of flour you use might be different from mine, so I suggest using slightly less water if it is too sticky or adding some flour during kneading to make it manageable. It's okay to do that.
The amount of oil required to add to the roti during folding is very little—just about a few drops for each roti. Usually, the roti chef dips his hand in the ghee and applies it to the surface with his oiled hand.
The best way to understand the process is to watch the video embedded in the blog post or on YouTube: https://youtu.be/mml3bZ_R-_M.
Thank you so much for your interest in my work, and all the best!
Josh
Friday 22nd of October 2021
Hi,
Thanks for this great recipe!
I just thought id post a correction on one of the sentences on the origin.
"However, most Malaysian Indians are from the Southern State of Tamil Nadu, and there is little relation to Chennai"
Chennai is actually the capital of Tamil Nadu, so there is most definitely a connection.
KP Kwan
Saturday 23rd of October 2021
Thank you for the info. I have corrected the confusing sentence in the article :)
Yompi
Monday 15th of March 2021
I love Roti Kanai when it sweet flatbread usually eaten with banana and condensed milk.
Alecia
Saturday 13th of February 2021
I've just made this recipe (not yet cooked) but when divided into 8 portions, each weighed only 40g. Is the measurement of 80g here wrong or should I have doubled the recipe? Thanks
KP Kwan
Sunday 14th of February 2021
Hi Alecia, Thanks for pointing out the error. It should be only four, not eight portions. I have amended the mistakes in the recipe, and sorry to make you confuse. KP Kwan
Sally Teoh-Montgomery
Friday 13th of November 2020
Thanks KP for all your recipes. I will definitely try making Roti Canai as it is a winner here on the Gold Coast! Do you have the curries to eat with it. It has to be eaten with Indian curries and is mild and added with sambal to make it tastier and spicy. This is not so good with Nyonya curries etc. Please if you can, to follow up with the Indian Curries that can go with the Roti. Thanks and appreciate your time and kindness.
KP Kwan
Saturday 14th of November 2020
Hi Sally, I have a few curry recipes on this blog, but it may have been Malaysianized. Here are some of them: https://tasteasianfood.com/vegetable-curry/ https://tasteasianfood.com/easy-chicken-curry-recipe/ https://tasteasianfood.com/chicken-rendang/ https://tasteasianfood.com/beef-rendang-recipe/
KP Kwan