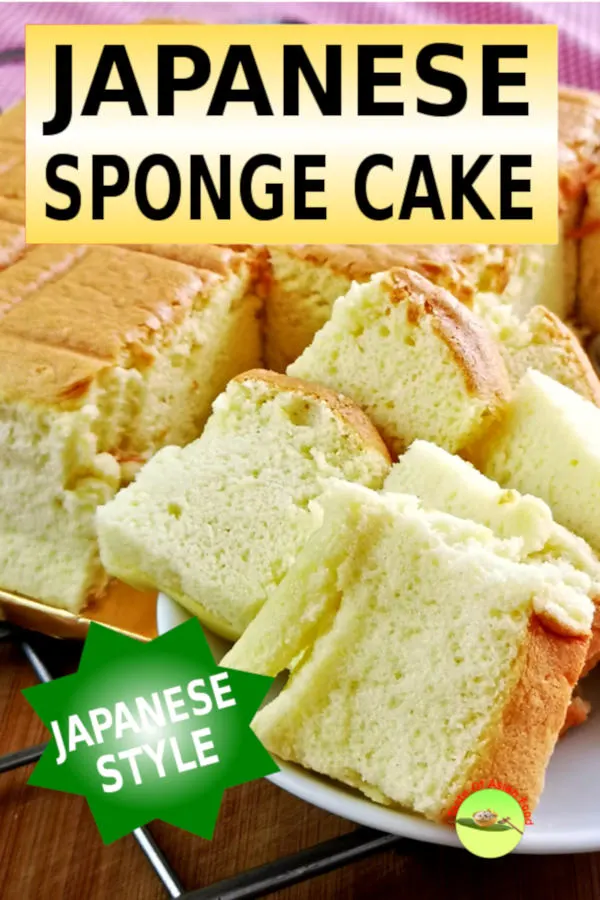
Finally, after many attempts, I am getting everything right to make the Japanese sponge cake.
The cake is bouncy like a sponge, with a soft and delicate texture that resembles cotton when you tear it apart.
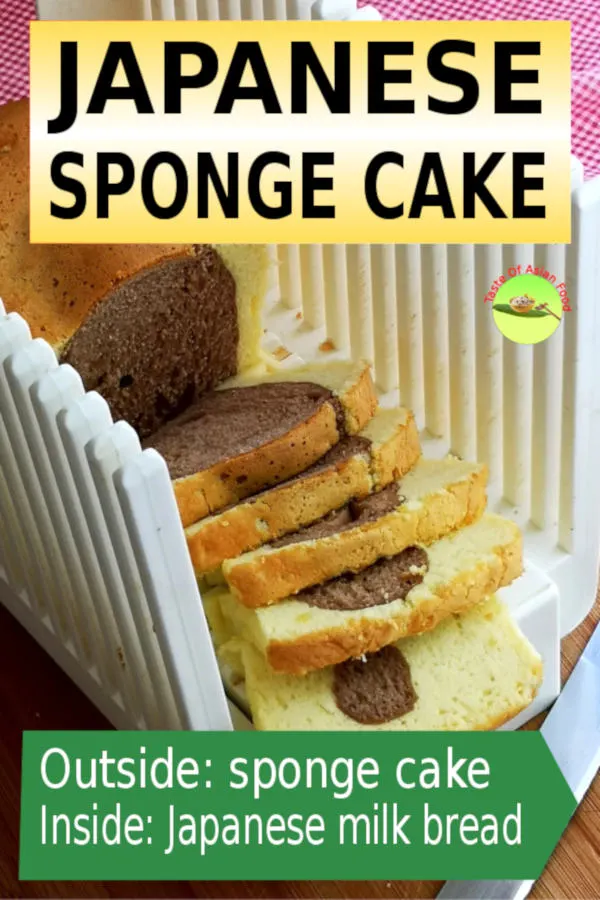
I also added the cake batter to the chocolate Japanese milk bread dough. Here is the result- my delectable bread cake that I missed so much after the nearby bakery decided to stop producing it.

Note: This post may contain affiliate links. Please read my privacy policy for more info. I may receive commissions for purchases made through links in this post. As an Amazon Associate, I earn from qualifying purchases.
How to make Japanese sponge cake in twenty minutes
This article is all about how to make the Japanese sponge cake. Please refer to this article to find out how to make incredibly soft Japanese milk buns.
Making Japanese cotton sponge cake is similar to most sponge cake recipes. Nevertheless, there are some fine details, which I will explain in detail in the following sections.
1. Measure the flour and butter correctly
The importance of sieving the flour
Measure 100g of plain flour and sieve at least once. I mean, plain flour is any wheat flour labeled as cake or all-purpose flour. The gluten percentage in these flours is relatively low, about eight to ten percent, which is ideal for making sponge cakes.
I sieve the flour not because it is dirty. The flour I get locally is very clean, but I want to ensure it is free from lumps and large particles. The fineness of the flour is critical to get the cottony texture. If you happen to get any superfine cake flour, go for it. It will significantly improve the texture of the cake. Since I have not been able to purchase it this time, I have to sieve the flour to ensure the cake turns out well.
Use melted butter to mix with the flour
Place 75g of unsalted butter in a pan/pot over low heat until it melts. You can melt the butter in the microwave oven using low heat for a minute. Keep an eye on the butter, and do not brown it, as it will alter the flavor and smell of the butter.
You may want to substitute the melted butter with corn oil. However, a sponge cake with good-quality butter has a better flavor.
Add the flour to the melted butter after it is cooled. We do not want to add the flour to the hot butter to avoid the flour being cooked at this time. We are not here to make choux pastry!
Do not worry if the flour and the butter form a sticky mass at this point. It will turn into a smooth batter after adding milk and egg yolks.
Note: This is not a gluten-free formula. I have not tried making a perfect sponge cake with any gluten-free recipe.
2. Add the milk
Add 60ml (4 tablespoons) of milk to the flour-butter mixture. You may pour all the milk into the mixture or add in batches. It will not make any difference to the result.
The milk will dilute the flour-butter mixture to form a thick paste.
3. Separate the egg yokes from the egg whites carefully
To form the batter, we must add the egg yolks to the flour-butter-milk paste above.
So far, the process is relatively straightforward. It is quite easy and does not involve much technique. However, please pay attention when you separate the egg yolks from the white. It can be the make-or-break step for this recipe.
Do not even let a trace of egg yolks contaminate the egg whites. We need pure egg whites to prepare meringue, and it has to be free from oil to be successful. Egg yolks are oily, so it has to be very careful not to break them.
Here are my recommended steps:
- Use a clean stainless steel bowl to keep the egg whites. Wipe the bowl with paper towels to ensure it is free of oil. The bowl must be large enough as we will use it to beat up the egg whites to form the meringue.
- Use the egg yolk separator to remove the egg white from the yolk. I always crack the egg in a separate bowl to ensure any broken eggs will not contaminate the bulk of the whites.
- It is not possible to separate all the whites from the yolks. However, there should not be a trace of yolk in the white as it will hinder the expansion while making the meringue.
4. Making the batter
Lightly beat the egg yolks and add to the flour-butter-milk mixture. Again, I have tried to add the egg yolks in batches to the mixture, but it makes no difference compared to pouring all the yolks in one go.
The egg yolks will dilute the paste further into a batter. It is at this time that you need to mix it thoroughly. I mean to mix it, not to beat it, as beating will create air bubbles that are not a welcome inclusion to the cotton-like texture.
Mix it in one direction until it is free from any visible lumps. The final batter should have a very smooth texture. At this stage, you can add some vanilla extract if you prefer.
Once you have done that, you have won half of the battle. Let’s move on to prepare the meringue.
5. Beat the egg whites until it forms stiff peaks
The egg white should be at room temperature while making the meringue. Remove the eggs from the refrigerator and wait for them to return to room temperature before cracking them.
Beat the egg whites with a hand-held mixer or stand mixer at low speed. If the room temperature is too low during winter, place the bowl of egg whites in a hot water bath. Warm egg whites can trap more air in their structure and expand their volume rapidly during the beating process.
- Add 80g of castor or fine sugar to the egg white after fifteen seconds of beating.
- Continue beating the egg whites until the volume triples. The egg white will change gradually from transparent to pure white and become thicker.
- Eventually, the egg whites become so thick that when you switch off the electric beater and turn it upside down, the egg white that sticks onto the beater blade will become so stiff that it will firmly stand without drooping. Beat the egg whites until it can form firm peaks.
Nevertheless, some bakers prefer to beat the egg whites to form a soft peak, meaning the peak will droop a little when you overturn the beater blade.
How to maintain the best volume for the meringue
If the meringue forms only until the soft peak stage, it will lose volume quickly when you start to fold since it is less stable. On the contrary, meringue that forms a stiff peak stage is firmer and needs more folding until it can be incorporated uniformly with the batter. The longer you fold, the more the batter will deflate.
My preference is first to beat it until it forms a soft peak, then beat further by stopping every twenty seconds to check if it achieves the stage of a stiff peak. I do not want to overbeat it because the meringue is hard to combine with the batter once it becomes too stiff.
I will dilute the egg yolk mixture with a quarter of the meringue so that it is easier to mix, then add the diluted batter back to the bulk of the meringue. Fold the meringue into the batter slowly until it is almost homogenous.
The batter will deflate beyond the optimum level if you fold the meringue until the batter is homogenous.
Then, I will pour the egg mixture into the cake pan. The pouring action will finish the last bit of mixing, eventually producing a homogenous cake mix in the pan.

6. Line the cake pan with baking paper (parchment paper)
Line the cake pan with a large piece of baking paper, enough to cover the sides of the square baking pan. Brush the paper with some melted butter.
Since I am using a cake pan with a detachable base, I have to wrap the pan’s exterior with aluminum foil to prevent the water from the water bath from seeping into the pan. Do the same if you use a springform pan.
After pouring the cake mix into the pan, you will notice some bubbles on the surface. These bubbles will create little craters on the surface if you do not remove them. You can do this by:
- Gently tap the cake pan a few times to break the large bubbles.
- Use a bamboo skewer or toothpick to break the smaller bubbles.
7. Baking at the right temperature
Place the cake in the hot water bath in a preheated oven at 150°C/300°F for sixty minutes.
But it may not be right sometimes!
The recommended oven temperature and baking time are among the most unreliable measurements in any cake recipe. Most of the ovens do not have a very accurate temperature indicator. The heat distribution and the size of the oven are other factors that affect the final result.
I suggest taking a quick look at the cake after baking for forty minutes. If the cake has already expanded, then it should be fine. Otherwise, increase the temperature by 10°C to ensure the air trapped in the batter expands and pushes up the cake.
When the cake is nearly done, you can open the oven door more often without worrying the sudden drop in temperature will cause the cake to deflate. Check the color of the cake. The actual baking time will depend on the color of the cake. Bake it until golden brown.
8. Do not cut the cake immediately after baking
Remove the cake from the oven and water bath and let the cake cool on the table for fifteen minutes. The cake will shrink a little and detach from the sides of the pan. If not, run a sharp knife along the sides to loosen it.
Overturn it onto a wire rack and remove the paper. Then, place a cake board on it and revert the cake again. Now you have Japanese sponge cake ready to cut and serve.
Additional information – May 2020
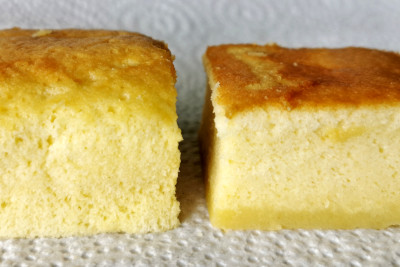
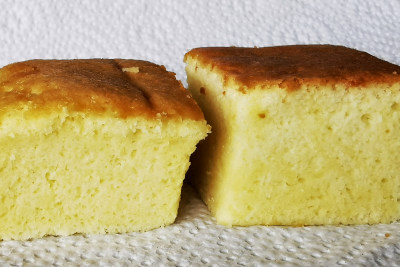
I have just revisited this recipe as some readers could not produce the same result as mine while following the recipe diligently. There are two common problems that I want to address.
– The cake is undercooked at the bottom.
– The cake is dense.
1. Why is the sponge cake undercooked at the bottom?
The cake is baked in a water bath. The purpose of the water bath is to provide slow and even heat, protecting the delicate sponge texture. The cake will rise slowly and evenly with no rapid expansion, achieving a smooth and cottony texture.
However, the water at the lower part of the cake brings down the temperature, causing the upper part to expand faster than the lower part, making the bottom denser than the top.
To solve this problem, I have made two adjustments:
– First, increase the temperature to 160 °C/320°F.
– Put the cake on the lowest rack of the oven. The bottom of the cake will heat up efficiently now and rise at the same speed as the top, and will not cause the formation of a dense layer.
The water bath will ensure sufficient moisture in the oven, forming a flat top surface without cracks, and a moist texture.
The lowest rack of my oven is just one inch above the bottom heating element. You may need even higher than 160°C if it is further away from the heating element. You have to forgo the water bath if it still doesn’t work. There are no two ovens that behave the same. The cake will become dryer without a water bath, though.
The most common reason why the sponge cake is still uncooked after baking for one hour is due to low temperature. The distance between the baking rack and the heating element makes all the difference. You know your oven best!
2. Why is my sponge cake denser than what is shown in this post?
In my opinion, the main reason is overmixing while folding in the meringue. If I mix until the meringue is disappeared, the cake will deflate too much, resulting in a dense texture.
It is better to fold in the meringue gently and stop when there are still traces of meringue scattered randomly in the batter. Pouring the batter into the cake pan slowly from a high position will naturally give the batter a final mix.
Also, the meringue should be beaten until you can make a stiff peak when leaving up your spatula. Otherwise, it will collapse rapidly during mixing and folding, resulting in a dense cake.
Take a look at the two images below.


Variation: How to make Japanese sponge “cake-bread”
I also combine this recipe with the Japanese milk bread published in this blog to create a cake-bread loaf. You can refer to the bread recipe article to make the bread. I have added a teaspoon of cocoa powder to change the bread to a chocolate color.
To do this. Place a small dough of the bread into a loaf pan. Pour the sponge cake mix into the dough after it doubles in size. Bake at the same temperature and duration as the sponge cake recipe.
Related cake recipes
If you enjoyed making this Japanese sponge cake recipe, I highly recommend you look at some related cake recipes on this food blog.
- Japanese castella cake is made with bread flour instead of cake flour or all-purpose flour, with no butter and baking powder. It has a springy texture, a slightly gooey consistency, and a dark crust.
- Another option worth trying is Japanese cheesecake, which is incredibly soft, with a cottony texture and soufflé-like crumbs.

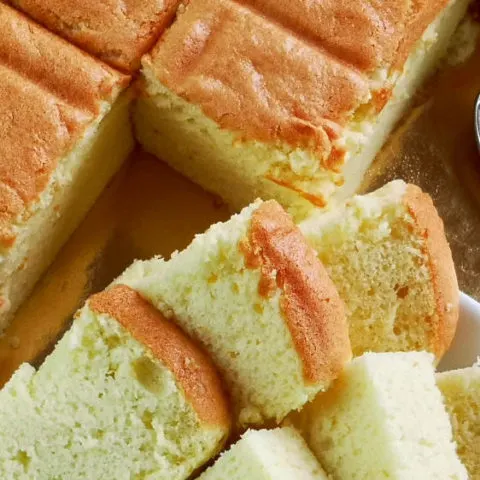
Japanese Sponge Cake
Japanese sponge cake is bouncy like a piece of sponge, with the soft and delicate texture resemble cotton when you tear it open.
Ingredients
- 100g (3.5 oz) cake flour
- 75g (2.6 oz) melted butter
- 60ml (4 tbsps) milk
- Vanilla extract (optional)
- 6 large eggs
- 80g (2.8 oz) castor sugar
Instructions
- Measure the plain flour and sieve a least once.
- Add the flour to the melted butter after the butter is cooled. Mixed well.
- Add the milk. Mix well.
- Lightly beat the egg yolks and add to the flour-butter-milk mixture. Mix it thoroughly.
- Beat the egg whites with a hand-held mixer at low speed.
- Add the sugar into the egg white after about fifteen seconds of beating.
- Continue beating the egg whites until it can form a stiff peak.
- Add a quarter of the meringue to the batter to dilute the batter so that it is easier to mix, then add the diluted batter back to the bulk of the meringue. Fold the meringue into the batter slowly until it is almost homogenous.
- Line the cake pan with a large piece of baking paper. Brush the paper with some melted butter.
- Pour the cake mix into the pan.
- Gently tap the cake pan a few times to break the large bubbles.
- Place the cake on the lowest rack, with the hot water bath. Bake at 160 °C/320°F for sixty minutes.
Notes
If you encounter any audio / visual problem of viewing this video, you can view it from YouTube by clicking this link, which will open in a new tab.
Nutrition Information:
Yield: 9 Serving Size: 1 cake cut to 9 portionsAmount Per Serving: Calories: 187Total Fat: 10gSaturated Fat: 5gTrans Fat: 0gUnsaturated Fat: 4gCholesterol: 142mgSodium: 105mgCarbohydrates: 18gFiber: 0gSugar: 9gProtein: 5g
Mark
Friday 27th of March 2026
Hello, not sure if you know but is it possible to use dairy free milk and butter ad I'm intolerant?
KP Kwan
Tuesday 31st of March 2026
Yes, you can use non-dairy milk. I suggest using soy milk, as it has a neutral flavor.
Penny
Friday 20th of June 2025
Hi can I have a fan oven what setting do I use and will it work in a fan over..thankyou
KP Kwan
Sunday 22nd of June 2025
It should be fine by using a fan oven, with the temperature setting as in the recipe
Delicious Japanese Cotton Sponge Cake
Sunday 2nd of March 2025
[…] Japanese sponge cake – How to make the most cottony and bouncy cake – https://tasteasianfood.com/japanese-sponge-cake/ […]
Rochelle
Monday 17th of February 2025
Can you give me an adjustment for High Altitude. I live at 7000.
KP Kwan
Wednesday 19th of February 2025
I would suggest increasing the temperature by 10 degrees Celsius and adding an extra tablespoon of milk. I would love to know the result, as I have not had the opportunity to bake at such an altitude. Thanks!
Allison
Monday 20th of January 2025
Can you please convert this recipe so it can bake in smaller 4" cake pans? What would be the cook time? Is there a formula for baking batter in different sizes?
KP Kwan
Tuesday 28th of January 2025
The baking pan I use is an 8x8 inch square. If you have a 4-inch square pan, you can reduce the amount of ingredients by two-thirds, or you can use the same amount to make three smaller cakes. This is my rough calculation, which I have not yet tested. Also, use the same temperature but reduce the baking time to 50 minutes. I hope it works well!