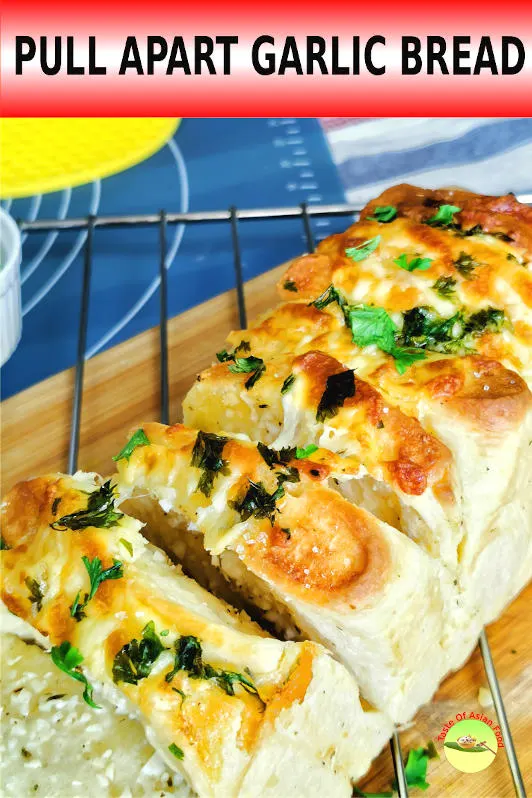
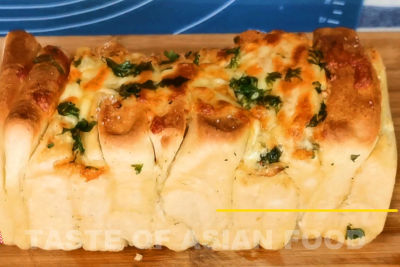
This Pull Apart Garlic Bread has a unique texture and presentation. It is a milk-rich bread with the garlic butter sandwiched between thin dough layers. As a result, you can pull it apart easily. The bread is topped with shredded cheese and parsley. It is a winner in all aspects, and it is fun to make.
I was first attracted by the presentation and layered texture of this pull-apart garlic bread when I visited an Asian bakery. Before I get to know the pull-apart garlic bread, I only assume that it is only baguette spread with garlic butter.

The presentation is stunning. I quickly read and watch every recipe that I can find, and they share the same unique characteristics:
- The dough is rolled out into thin slices and arranged vertically in the loaf pan.
- Each dough slice is separated with garlic butter.
Most after pull-apart garlic bread recipes I have seen are prepared by dipping the dough into a mixture of butter and herbs and arranging them randomly in a loaf pan. This pull-apart garlic bread is somehow different.
Since most of these recipes are written in Chinese, I’ve decided to write in English with improvisation.
Here is a detailed explanation of how to prepare my version of pull-apart garlic bread.
Note: This post may contain affiliate links. Please read my privacy policy for more info. I may receive commissions for purchases made through links in this post. As an Amazon Associate, I earn from qualifying purchases.
1. Preparing the bread dough
The method of making the dough is quite standard. You can refer to the whole wheat bread and Japanese milk bread recipes for more information on the dough making process, but I will make a precise explanation here for your convenience.
The proccess begines by mixing all the dry ingredients.
Place all the dry ingredients (flour, yeast, salt, sugar) in the mixing bowl, including the active dry yeast.
I am using bread flour alone, but you can substitute part of it with wholemeal flour.
Is it OK to mix the yeast with salt and without water?
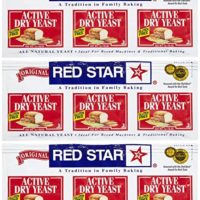
Since I am using active dry yeast, there’s no need to add warm water to activate the yeast. I am also not worried about whether salt can hinder the activity of the yeast. The dough perfectly rises, so I can confirm it’s not a concern in practice.
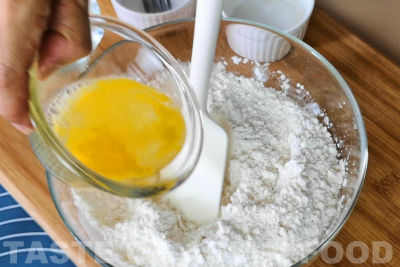
Add the wet ingredients
After that, add the milk and egg to the dry ingredients and work into a wet dough.
I’m using 100% full cream milk for additional flavor, but you may use water instead.
Since I need to roll out the dough in the following step, the dough should be reasonably firm and stretchable. Therefore, I do not want to make the dough too wet. The baker’s ratio I used is 66%, which means the total weight of the wet ingredients (milk and egg) is 66% of the flour’s weight. I also add 30 grams of butter after kneading halfway. The result is a non-sticky and highly stretchable dough.
Kneading the dough
That’s no hurry to knead the dough immediately. I leave it aside for an hour to let the water and flour interact, forming gluten and aroma. You can skip this step if you want to speed up the process, but letting it autolyze will shorten the time required to knead the dough.
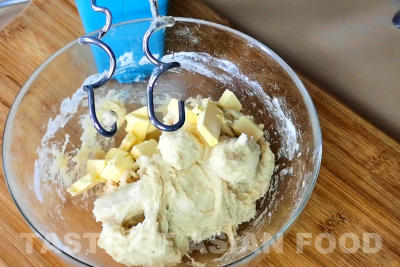
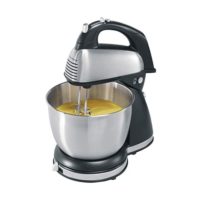
After resting the dough for about 1 hour, I knead it with an electric mixer attached with a dough hook. The dough will eventually come together after a few minutes.
Cut the butter into smart cubes, add to the dough and continue kneading. It takes a few minutes to incorporate the butter thoroughly into the dough. By then, the dough has become an elastic ball, and the surface will be smooth and shiny, clean, and no longer stick to the bowl.
How long should I knead the dough?
The exact kneading time depends on the speed of mixing and the type of flour. It also depends on whether you take an intermittent rest when you are tired. If you’re unsure when to stop kneading, perform a simple test by stretching the dough with your hands. It is ready when you can stretch the dough until paper-thin and translucent without breaking. Some cookbooks refer to this test as a ‘the windowpane test.’
Once you are satisfied with the results of the windowpane test, cover it with a damp cloth and wait until it doubles in size at room temperature.
2. Preparing the garlic butter
While I’m waiting for the size of the dough to double, prepare the garlic butter mixture.
- Mince the garlic (because I do not have a garlic crusher).
- Mix the garlic with the softened butter.
- Season it with salt if you are using unsalted butter.
- Add a pinch of dry mixed herbs or rosemary and combine.
3. Shaping and baking
Here it comes to the step that is significantly different from other bread.
- Once the dough is double in size, punch it down and transfer it to a working surface. The dough should be smooth, stretchy, soft. There is no need to add flour to the working surface because it is not sticky.
- Roll out the dough to a rectangle because you need to cut it into small pieces of equal size. The measurement depends on the loaf pan that you use.
- Since I need to arrange the pieces of dough upright in the loaf pan, I will make sure that the size is slightly shorter than the width of the loaf pan, and the height is about two-thirds of the height of the pan. With that in mind, then work backward to calculate the exact size of the rectangle that I need to roll out.
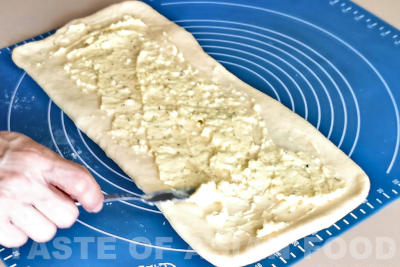
- Roll out the dough thinly so that you will get many layers when you stack them up. (Please refer to the image in the recipe below.)
- Next, spread the garlic butter on the surface evenly. Cut the dough into a small rectangle with the size that fits the width of the loaf pan.
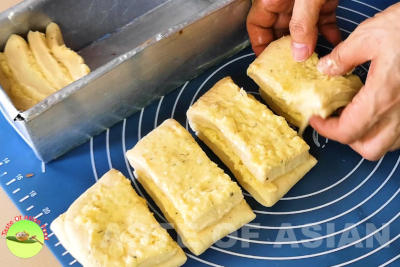
- Arrange the dough pieces upright in the loaf pan.
- Cover and let it proof for thirty minutes.
- Apply some egg wash on the surface.
4. Get ready to bake
- Preheat the oven to 180°C/350°F.
- Apply some egg wash on the surface.
- Bake for 20 minutes on the lowest rack. The bread should change color after twenty minutes. If it doesn’t happen yet, you can wait a little longer before removing it from the oven.
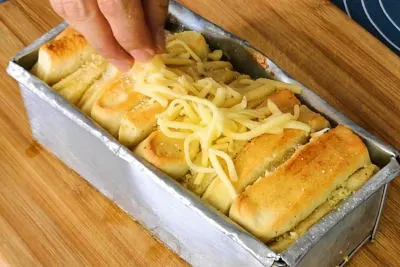
- Sprinkle some sugar on the surface.
- Spread some shredded or grated cheese of your choice and some chopped parsley on the surface. Return the bread to the oven, and bake for another 10 minutes or until the color is golden.
- Remove the bread and cool at room temperature. Unmold the bread and is ready to serve.
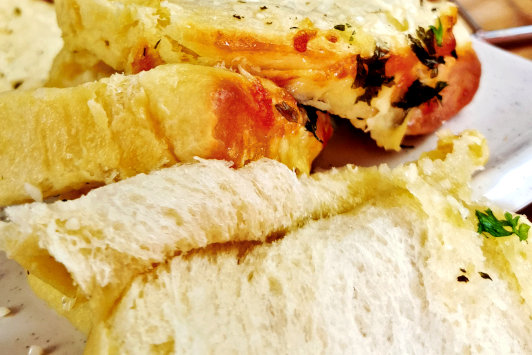
The texture of this bread is phenomenal. You don’t need to cut it into slices. You ca!n pull it apart easily by hand because the garlic butter separates each piece that arranged upright. You can also peel the bread into paper-thin pieces.

It is now your turn
That is how I made my version of pulled apart garlic bread. It is significantly different from garlic bread made from applying garlic butter on the baguette.
It is a soft bread and is popular in the Asian bakeries. Since I have added some cheese on the surface and some mixed herbs in the garlic butter, the flavor should be quite universal and appeal to everyone.
Give it a try and let me know the result in the comment below.
Pull apart garlic bread


Pull apart garlic bread with an incredible texture that can hand-peel into paper-thin layers. It is an Asian style bread with cheese topping.
Ingredients
Ingredients A
- 20g (four tsp) castor sugar
- 250g (two cups) bread flour
- 1 tsp active dry yeast
- 1/2 tsp salt
Ingredients B
- 50g egg (weight of one egg minus the shell)
- 115g (4oz) full cream milk
- 30g (one oz) unsalted butter
Ingredients C
- 35g (about four cloves) garlic
- 3/4 tsp salt
- 1/2 tsp dry mixed herbs
- 60g (two oz) unsalted butter
Ingredients D
- 2 tsp castor sugar
- 2 tbsp shredded cheese of your choice
- Freshly chopped parsley
- Egg wash
- 8cm x 20cm loaf pan
Instructions
- Combine ingredients A in a mixing bowl. Add ingredients B except for the butter, mix for 5 minutes.
- At the butter and continue kneading until it can be stretched paper-thin without breaking.

- Cover the dough with a damp cloth, and wait until the size is doubled. Punch down the dough. Road it out to become a large rectangle. Mix ingredients C, and apply on the dough.

- Cut the dough into pieces that fit the width of the loaf tin. Arrange the pieces vertically in the loaf tin. Cover and let it proof for thirty minutes.

- Preheat the oven to 180°C/350°F. Apply some egg wash on the surface.
- Bake on the lower rack for 20 minutes. Remove from the oven. Sprinkle some caster sugar, strategies, and chopped parsley.

- Continue baking for another 10 minutes or until the cheese turns golden. Remove and serve.

Recommended Products
As an Amazon Associate and member of other affiliate programs, I earn from qualifying purchases.
-
 Hamilton Beach 64650 6-Speed Classic Stand Mixer, Stainless Steel, 4-Quart Bowl and Accessories
 -
 OXO Good Grips Soft-Handled Garlic Press,Black,One Size
 -
 Red Star GlutenFree Active Dry Yeast, 0.75 oz, 3 ct, 3 pk
 -
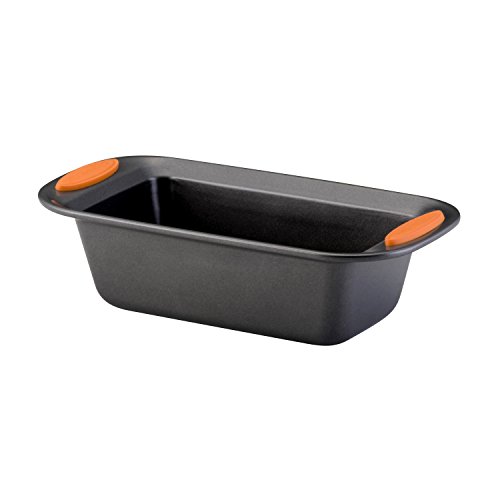 Rachael Ray 54079 Yum-o! Bakeware Oven Lovin' Nonstick Loaf Pan, 9-Inch by 5-Inch Steel Pan, Gray with Orange Handles
Nutrition Information:
Yield:
1Serving Size:
1Amount Per Serving: Calories: 1149Total Fat: 54gSaturated Fat: 30gTrans Fat: 1gUnsaturated Fat: 19gCholesterol: 500mgSodium: 3467mgCarbohydrates: 124gFiber: 5gSugar: 14gProtein: 40g
This data was provided and calculated by Nutritionix on 8/14/2020
Marilyn Messina
Wednesday 23rd of September 2020
Hello, my name is Marilyn and I'm a 68 year old retired nurse in the US. I live alone in a regular house in the suburbs with my dog and love being retired. I've recently discovered Japanese milk bread and have made it 6 times and was perfect each time! I've just put in the oven bread from your recipe for whole wheat bread. It's the second time. I have one question....using the food processor like you showed for kneading is genius. I had difficulty getting the dough out after one minute as you showed because it did not hold together well and I like to keep it neat. Is there a better way to remove it? I'm enjoying your content very much and will make the pull a part garlic bread tomorrow. I give the bread away to my kids and neighbors. They are very impressed. I give you the credit. Thank you. So sorry I wrote so much but this is the first time I've ever left a comment.
KP Kwan
Wednesday 23rd of September 2020
Hi Marilyn, Thank you for taking the time to post your comment. From my understanding, there are two reasons if you have difficulty removing the dough from the food processor. The first reason is that kneading is insufficient. The time that you need can be different from my suggestion because of the speed and power of your processor is different from mine. It also takes a longer time to process if your dough is larger than mine. The endpoint is when it becomes smooth and no longer sticks to the processor when you remove it. The second reason is too wet. It can happen even when you use the exact amount of water/milk/egg because the water-holding properties of the flour that you use might be different from mine. If the dough does not come clean from the mixing bowl of the processor, you may need to use less water or add a small amount of flour. I find that the easiest way to remove it is to use a silicone or plastic spatula. Best regards, KP Kwan
KP Kwan
Sunday 16th of August 2020
Hi, this is KP Kwan. I am happy to see you in this comment area, as you have read through my recipe. I am pleased to reply to any questions and comments as soon as possible.